5 Easy Ways to Transfer Photos from Your iPad or iPhone to Mac
For those looking for ways to transfer the photos and videos out of their devices, iPad or iPhone to their Mac be it as a backup, for further editing or to free up the storage, here are five simple ways.
Overview
Four of the five tutorials below involves downloading photos to your Mac, while the last one shows you how to upload photos to the iPhone or iPad. Without using any third party apps, they are as follows:
- Sync Your Photos and Videos to Photos App
- Manual Download using Image Capture App
- Transfer Small Batches of Photos via AirDrop
- Backup to iCloud only to transfer back to Mac
- Copying photos or videos to your device via Finder
1. Sync/Import Your Photos and Videos to Photos App
This is by far the easiest way. Connect your device, be it an iPad, iPhone or even iPod to the Mac using the USB charging cable. Fire up the Photos app and wait for it to prepare the photos to sync and download to your Mac. Here are the steps:
- Connect your device to your Mac using USB-A to lightning or USB-A to USB-C for iPhone and iPad or new iPad Pro, Air and Mini respectively.
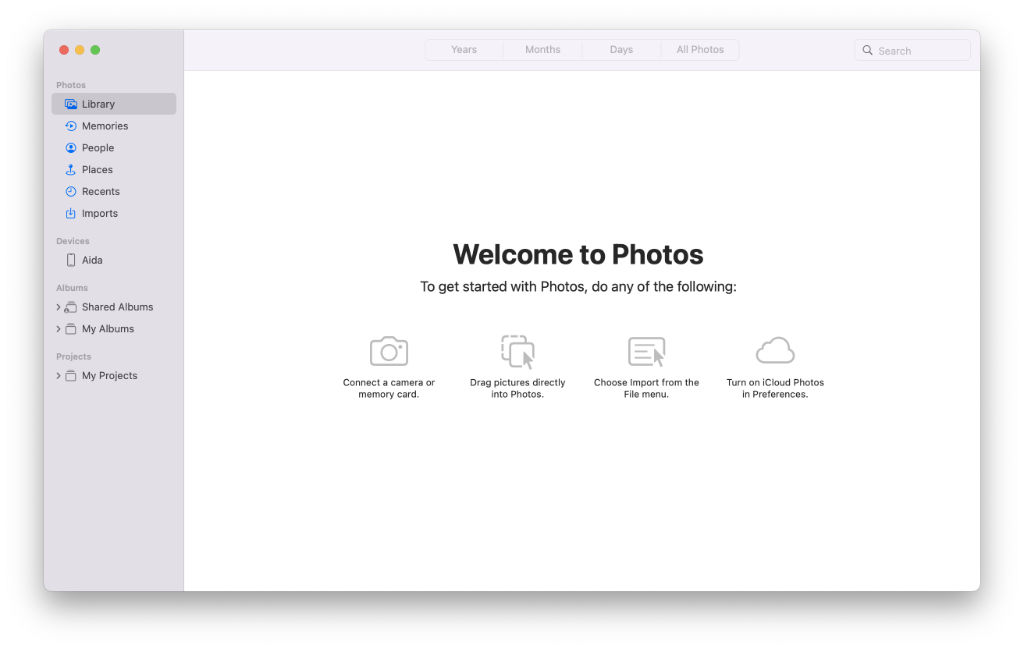
- Fire up the Photos app from Launchpad or via Finder > Applications

Photos App - Be sure to unlock your device either via FaceID, pin code or fingerprint sensor.

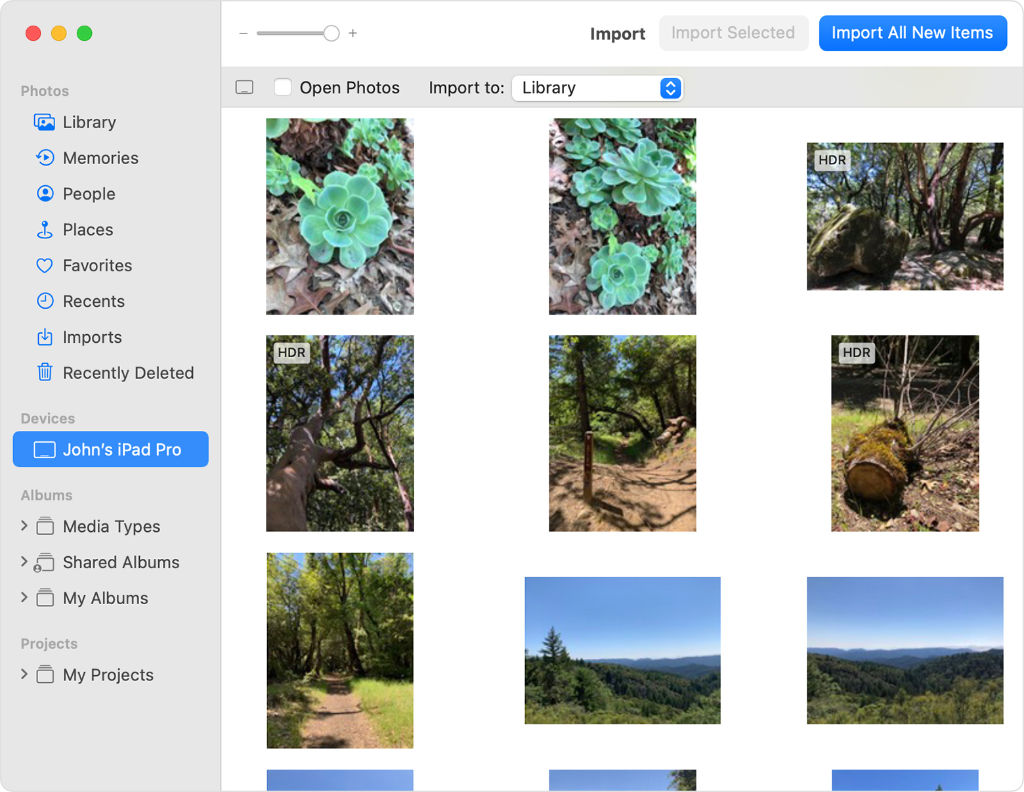
Unlock your device - Here you can choose to import only selected photos or import all, delete items after import and choose either to import to the Library or create a new album.

Preparing to Import - If you have used it before, you can also choose to Import All New Items. Once imported, you can use the Photos app on Mac to access the photos and organise this by album, edit them or share them on.

Photos Transfer from iPad or iPhone
What happens to the photos and videos after it is imported
Note that when you import your photos and videos into Photos app, it goes into a library. This becomes the System Photo Library that walks to iCloud Photos. The library file itself is stored under Pictures folder. However, you won’t be able to access the actually video or photo files itself there. You will need to use the Photos app to do that. Apple warns of corrupting the library if you try to access it outside of the app. To access photos and videos already in the Photos library, you must first export them. Here is more information on where the imported photos are on you Mac.
In order to transfer the photos and videos from your devices and have direct access to them via Finder, use one of the two next tutorials below (2 and/or 3). For more information about where to find your imported Photos.
2. Manual Download using Image Capture App
Our favourite mode of transfer is via an app on Mac called Image Capture, mainly because it gives us control over what files to download and where to save it to. Here are the steps:
- Connect your device to your Mac using USB-A to lightning or USB-A to USB-C for iPhone and iPad or new iPad Pro, Air and Mini respectively.
- Fire up the Image Capture app from Launchpad or via Finder > Applications. It is found in a subfolder called “Others”. Alternatively search for it using Spotlight (cmd+spacebar).
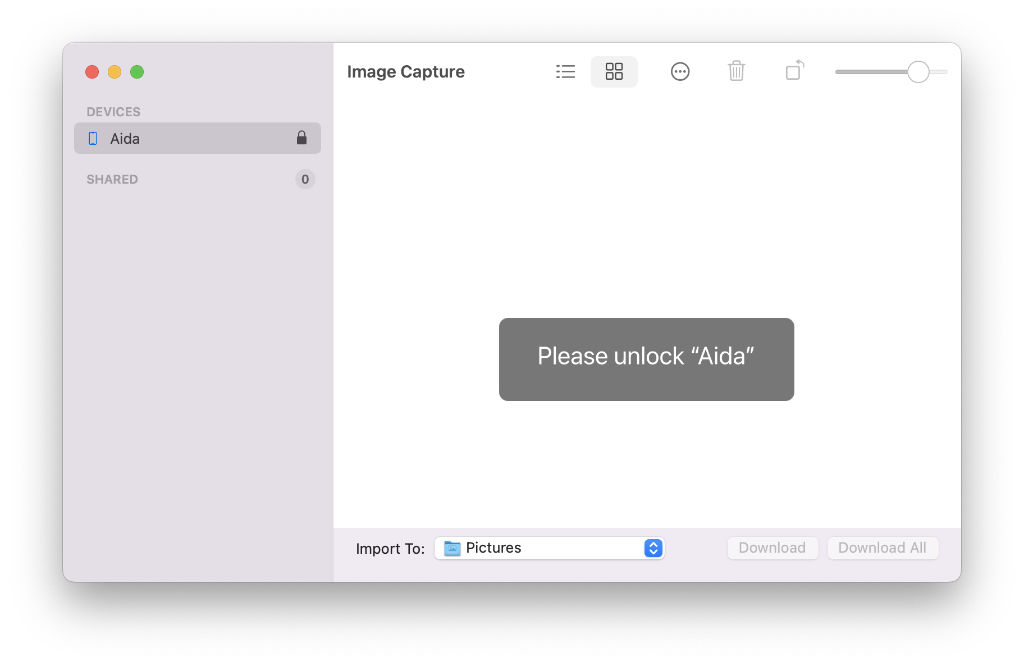
- Remember to unlock your device.

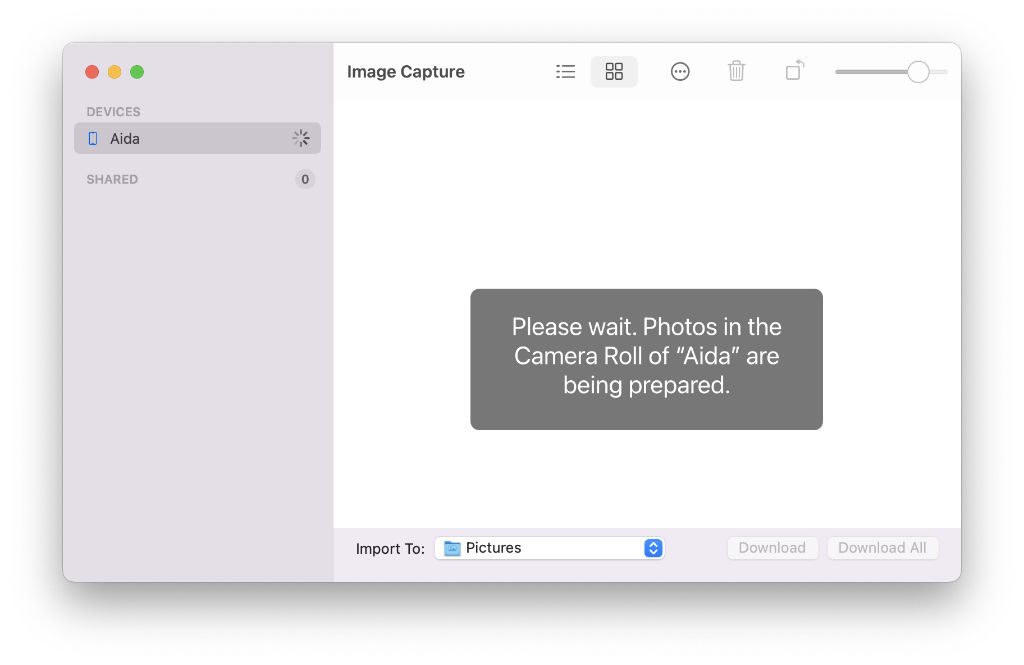
Image Capture unlock device - Click on the name of the connected device in the left side bar to load the images there.

Image Capture Loading Images - Before we start downloading, it is worth considering a couple of option a) where to import to and b) if you would like the photos deleted from the device upon download.
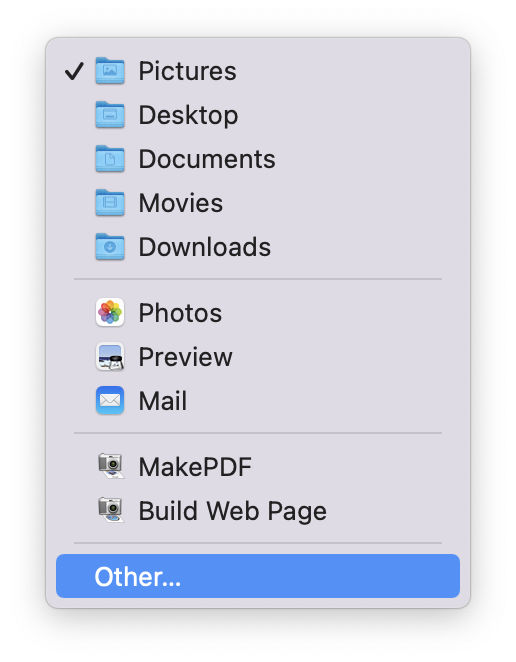
- By default, the photos will be downloaded to Pictures folder but you can choose several other options under Import To: at the bottom of the window. We go with Others then browse to a subfolder in the pop-up Finder window. That way you know exactly where your files are when you download them.

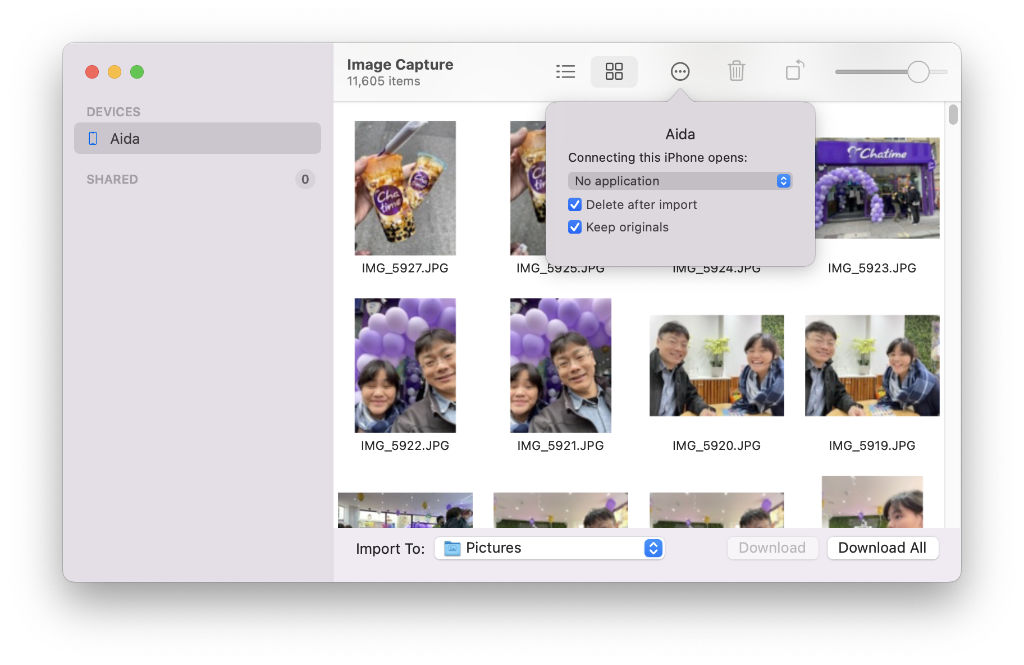
Image Capture Choose Other - You then need to decide if you want to Delete after import the photos or videos after import. Click on the circle icon with three dots inside on the top bar then tick the checkbox Delete after import. Here, you can also decide the what to do when the device is connected. We set this to No application. Other options are Photos, Image Capture, Preview and Mail. Be warned that if you have selected this option, the only copies left are the ones you downloaded to your Mac so be absolutely sure.

Image Capture Delete After Import - At this point, you have a choice of download options, select by clicking on the photos you wish to download, scroll down to select others if need be then click Download. Alternatively, you can click Download All.
3. Transfer Small Batches of Photos or Videos via AirDrop
This next option is best suited for small batches of photos/videos and is done wirelessly via AirDrop. For starters, the devices need to be near each other. You will also need to enable Bluetooth and WiFi as well as AirDrop service enabled on both devices. Here are the steps:
To enable AirDrop on iPad or iPhone to send photos and videos
- Enable Bluetooth and WiFi
- Turn off Personal Hotspot if this is enabled
- Open the Photos app, Click Select button in the top right corner then scroll and choose the photos and videos you wish to transfer. You can also tap and swipe in any direction to select multiple photos.
- When ready, tap on the Share button on the bottom left corner of the screen
- Then tap on AirDrop button
- You will see a list of nearby devices, choose the Mac desktop or laptop to send the photos

Note: You can also enable AirDrop quickly from the Control Centre. Swipe down from the edge near the top right corner. Tap on Bluetooth > AirDrop (to enable it) then choose one of the following: Receiving Off, Contacts Only or Everyone. As before, choose Contacts Only or Everyone to start sending or receiving.
To enable AirDrop on Mac to receive photos and videos
- Enable Bluetooth and WiFi,
- Check to ensure that AirDrop is set to receive from Contacts Only if the devices are registered to different Apple IDs. Or, if they are not in the Contacts, create one first.
- Alternatively, set the AirDrop to receive from Everyone. Remember to switch it back to Contacts Only or disabled completely when you are done.
- To do this, open Finder, then from the left sidebar, click AirDrop
- From the main windows you will see nearby devices, if you don’t see this, set the sending device to allow Contact Only or Everyone.
- In order for the Mac to be discoverable in the same way, click Allow me to be discovered by: then choose Contacts Only or Everyone
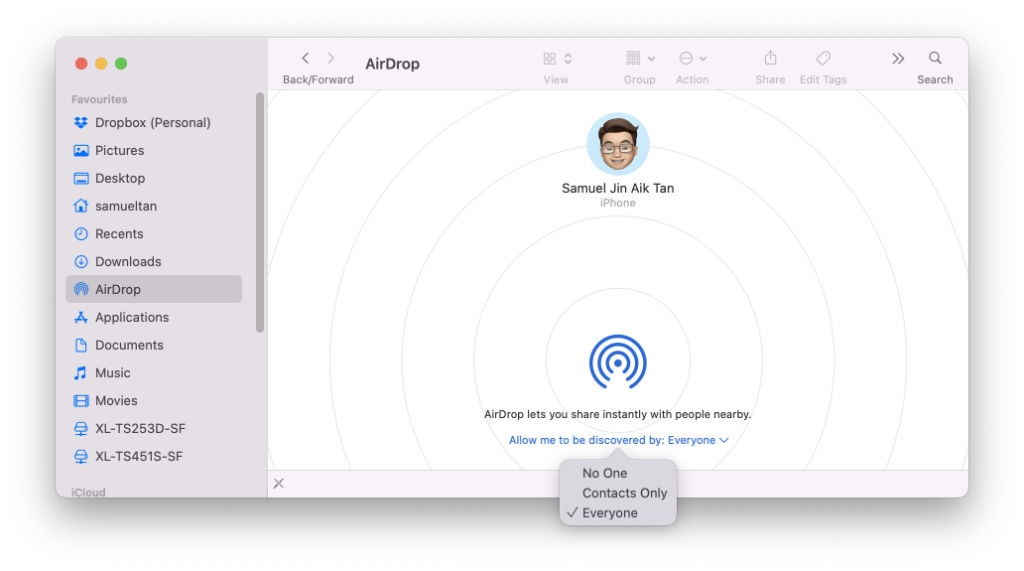
When the iPhone or iPad is transferring files to the Mac, you will get a notification. You need to either choose Decline or Accept in order for the photos to be transferred there. It defaults to Download folders.
Remember, AirDrop works both ways, so you can also send photos and videos from your Mac to the iPhone or iPad.
4. Backup to iCloud only to transfer back to Mac
This is a rather long winded way. If you have an iCloud+ plan, you can sync your photos to the iCloud storage from your phone and have your Mac sync back down your photos automatically. This method is quite seamless but requires some ground work. Also, you need to have the right plan before even your iCloud storage gets filled up. Choose between iCloud+ with 50GB, 200GB or 2TB storage with monthly fee to pay. For small batches of photos and videos, your might get away with syncing without an iCloud+ plan but be warned, there is a 5GB free storage limit which is not a lot when you factor in other files that may already be there from your device or devices such as documents and data.
Here are the steps you need on your iPhone or iPad to setup iCloud Photos
- Go to Settings > [Your Name] > iCloud
- Tap on Photos, then turn on iCloud Photos
And, here are the steps you need for you Mac
- Click on Apple icon (top left corner in the top task bar) then > System Preferences
- Click Apple ID
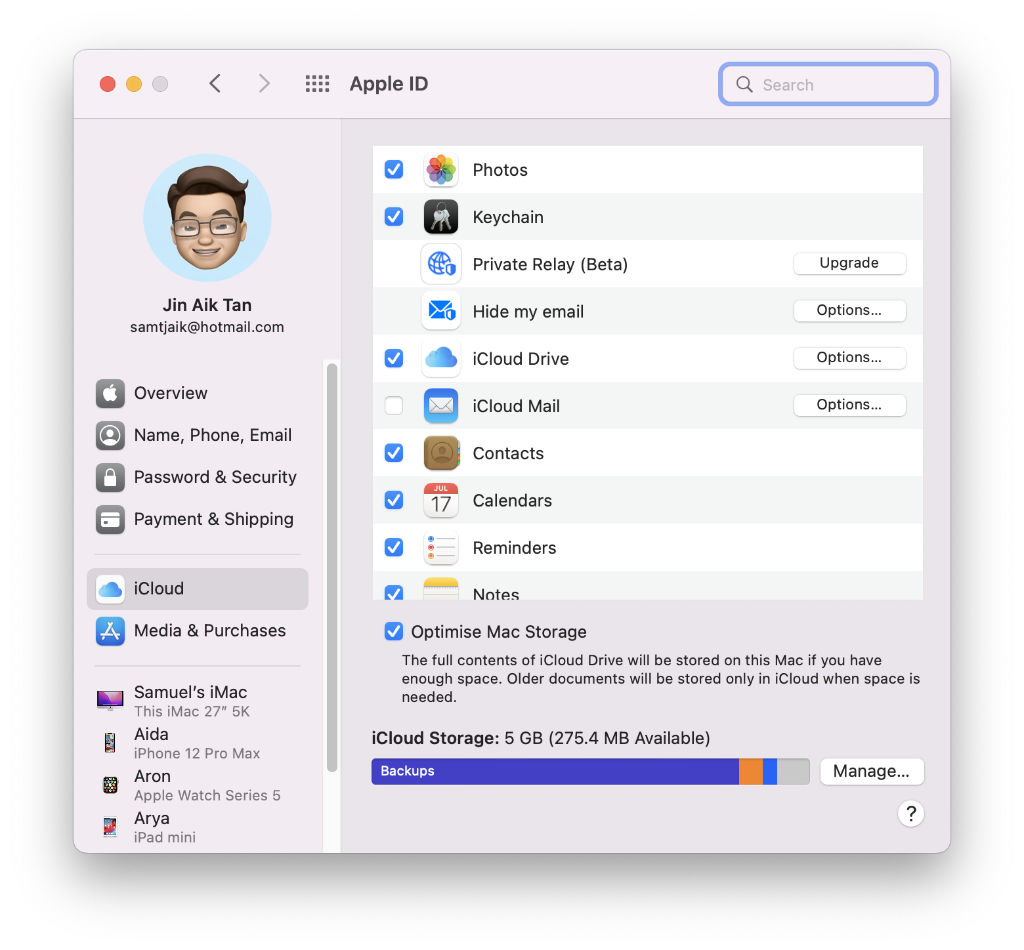
- Click iCloud in the sidebar, then select Photos

Apple ID iCloud Setup on Mac - It will take some time but both devices will have access to the same photos.
Once you have your photos and video syncing to iCloud Photos, you can access this via your other devices also syncing such as your iPhone, iPad, iPod touch, Mac and Apple TV. You can also access it via iCloud.com on any supported browser.
Here is how you get it on your Apple TV.
- Go to Settings > User and Accounts
- Select iCloud
- Turn on iCloud Photos.
For further help to do this, see Set up and use iCloud Photos over at Apple.
5. Copying photos to your device via Finder
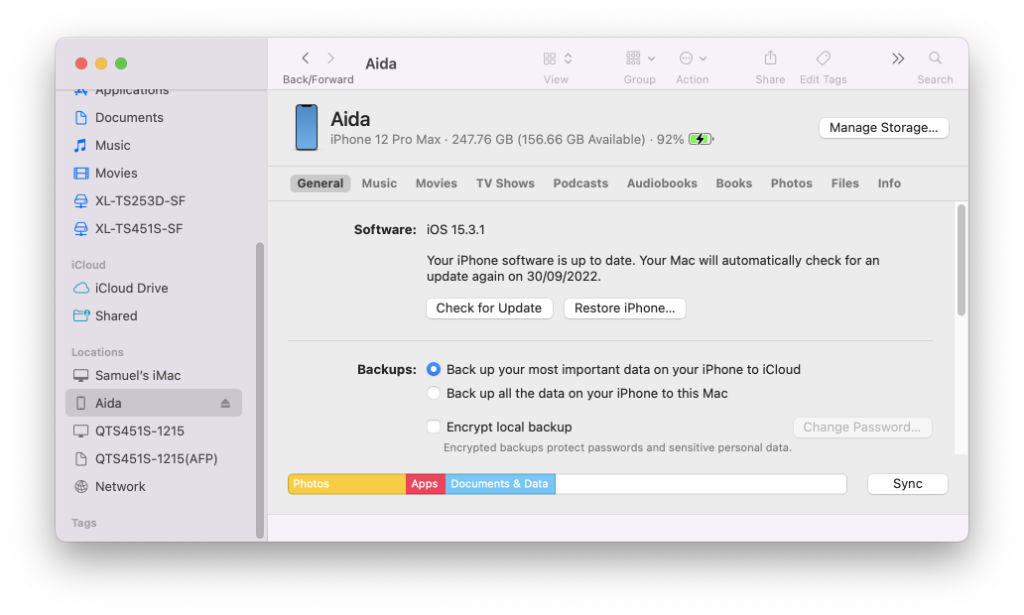
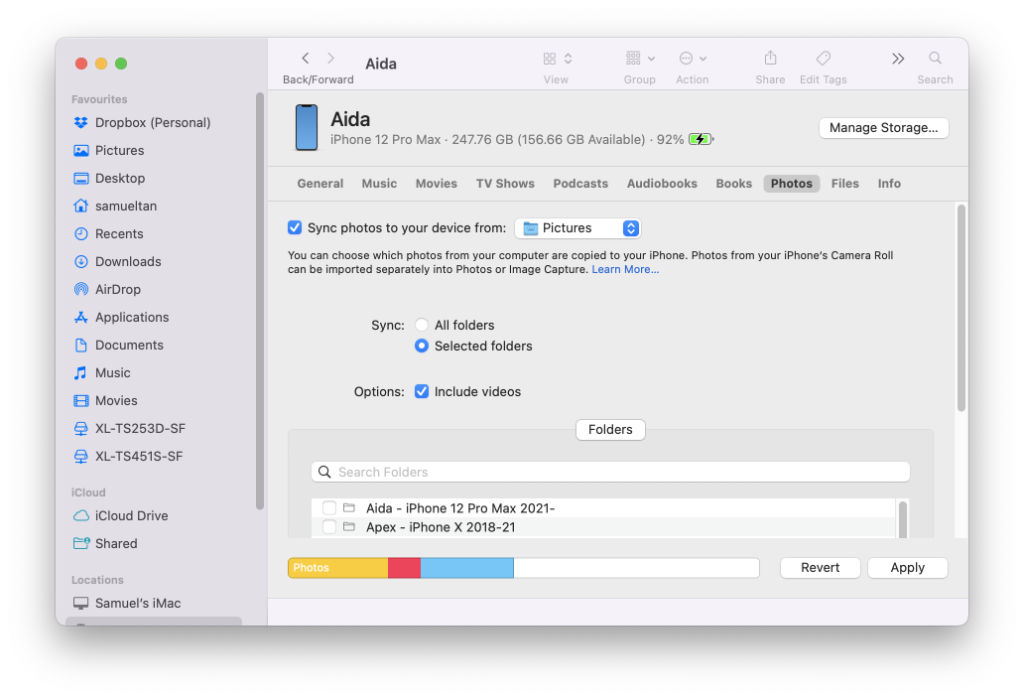
Not quite moving off or backing up the photos and videos from your device but the other way round. Here are steps to sync photos from your Mac to the iPad or iPhone. If you have accidentally downloaded and deleted those photos and wished you didn’t, use these step to upload it back into your device. Using Finder (file browser) on your Mac, browse to the connected device under (Locations) in the left sidebar, then choose Photos tab. Choose all folders or selected folders to upload. Here are the steps
- Connect your device to your Mac using USB-A to lightning or USB-A to USB-C for iPhone and iPad or new iPad Pro, Air and Mini respectively.
- Fire up Finder from task bar or Launchpad or quick short keys Command+F
- Click on the device name on the left hand column or sidebar
- This opens the sync window for your device, which allows you to perform a full backup of your device.

Sync via Finder - Click on Photos (tab) and check “Sync photos to your device from >Pictures”.
- Under Sync: choose either All folders or Selected Folders.
- Under Options: select include videos to also backup your videos.
- You can then click on Folders to expand the folder structure under Pictures and select the folder(s) to upload. You might need to resize the window or scroll down to reveal the list of folders in Pictures.

Finders Sync Photos Options - When you are ready click Apply.
- NOTE: the steps here lets you upload photos from your Mac to the device instead of download photos from your device to Mac. If you need to import phots from your device, use the Photos app or Image Capture app with steps shown above.
