How to use your iPhone as a Web Cam for your Mac
This is useful especially on old iMacs and MacBooks with 720p HD FaceTime webcam. New MacBook Pro 14 and 16 as well as MacBook Air M2 come with Full HD 1080p FaceTime webcam. While we recommended Full HD to 4K webcams for Mac mini, carrying an webcam around for the MacBook may not be the best idea. Why not use what you already have, the iPhone?
You don’t need to pay for a webcam to update the 720p HD webcam on your iMac or MacBook Air/Pro. Just use your iPhone and a stand.
What is Continuity?
If you have invested heavily on Apple’s ecosystem with your iPhone, iPad, MacBook and even iMac and Mac mini, you may already used one or two continuity features without realising this. It requires first and foremost that you are logged into your devices with your Apple ID.
The most famous continuity features are AirDrop to share files, contacts, photos and videos quickly between your devices and with others nearby and AirPlay to send your app window and video to another Apple device’s display such as the big screen on an iMac or Apple TV.
There are other less common but still helpful continuity features like unlocking Mac or iPhone and approving app purchases with your Apple Watch without having to enter your password. Sidecar, using your iPhone as an extra display. Without further setup, your Mac can piggy back on your iPhone’s fast Internet connection when it loses its WiFi signal, simply select the Hotspot. Also, you may have noticed that your current connected devices be it the iPad or Mac lets you take any incoming calls or make calls without reaching for the iPhone, same goes for SMS messages. Here is a quick list of the other features:
- Continuity Camera
- Continuity Markup
- Continuity Sketch
- Handoff
- Universal Clipboard
- Universal Control
For this article, we will focus on Continuity Camera, what it is, when do you need it and how to work it.
Search iPhone Continuity Camera Mount on Amazon
Continuity Camera
Often we find that our onboard webcam is simply not good enough, especially on older MacBooks with its 720p webcam. In fact, these are still being sold today. MacBook Pro 13 and MacBook Air 13 still carry the old webcams. For high quality video calls, you need at least Full HD 1080p resolution sensor.
This will produce a sharper image with more details for your FaceTime and Video calls. Unfortunately, not all of us have a spare web cam lying around. And even if we do, it would be a hassle to wired it up every time you need it let alone carrying it with your MacBook when travelling. The answer is simply to use what you already have, the iPhone.
Not just any ‘webcam’
Continuity Camera, part of the Continuity suite of features from Apple aims to do just that. To use your iPhone as a webcam on Mac. It has already proved itself to be a great feature as a camera to scan documents and to take photos for Mac. Now, we just have to set it up to work as a live video feed for the Mac.
This will not only allows FaceTime but apps like Zoom, Google Chat and Teams access to high quality video feed for your calls including the camera’s ability to capture better video in low light, choosing the different cameras (wide, ultra wide or telephoto) and Portrait mode with bokeh, things that are lacking with the onboard webcam.
New iPhone even supports Center Stage which again you can take advantage of on your old MacBook and iMac. Center Stage automatically pans and zooms in or out to capture a subject or subjects making sure that you and others are in the frame as you move around.
Beyond the camera, it also lets your MacBook or iMac use the microphone on the iPhone that is capable of focusing on your voice and cutting out surrounding noise better. You can decide to reverse this setting to capture all the noises too if you wish.
These are the reasons and benefits for using the iPhone as a webcam.
How to Setup the iPhone as a webcam/ FaceTime camera for the Mac
You need to make sure that you have macOS 13 (Ventura) or later on your Mac and iOS 16 or later on your iPhone before you even attempt the steps below. There is no need to wire the phone up, it works on both wired or wireless.
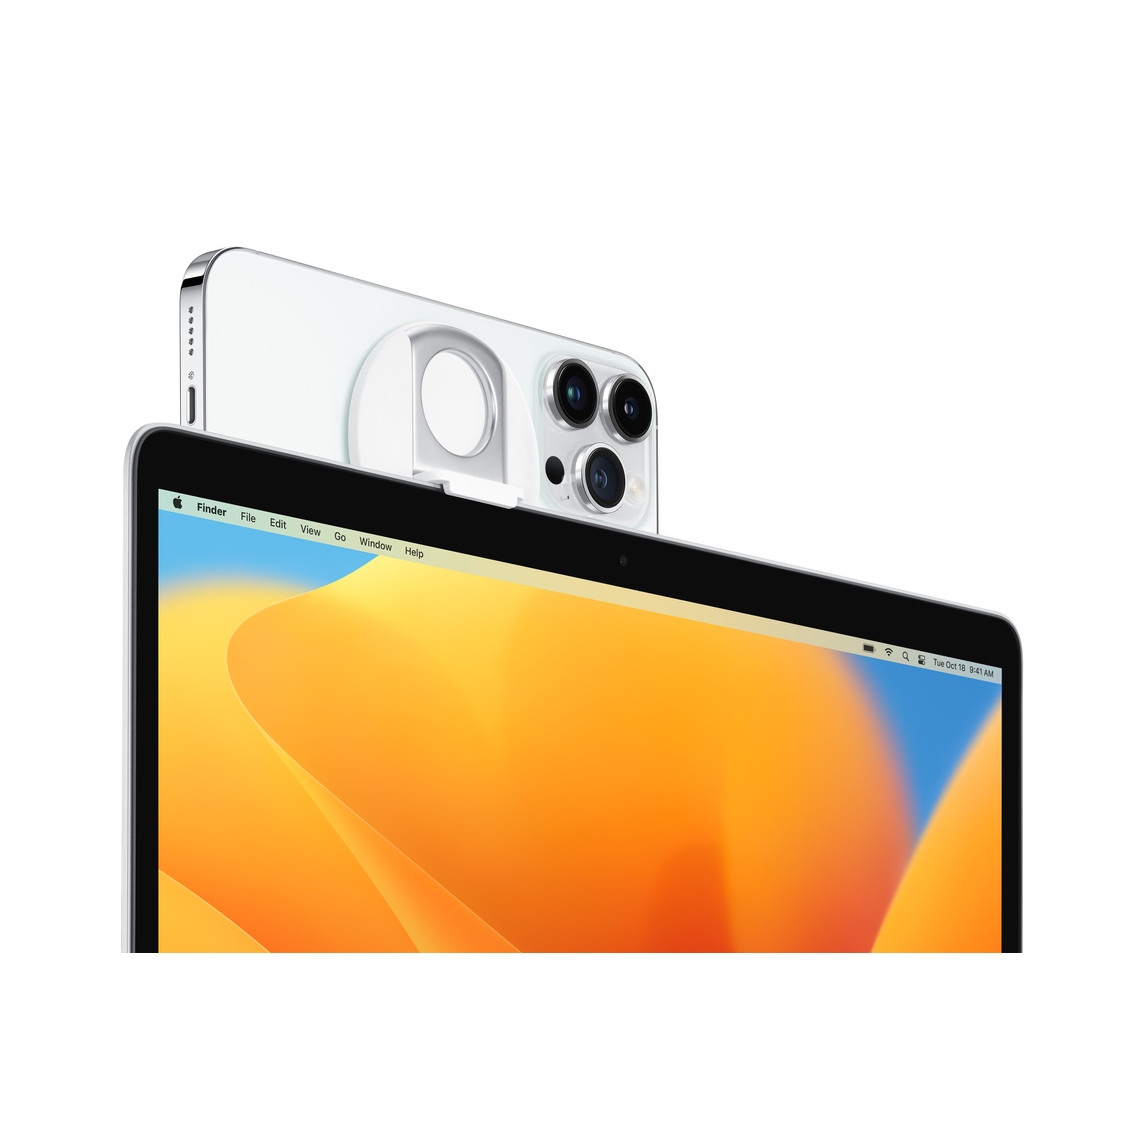
Search iPhone Continuity Camera Mount on Amazon
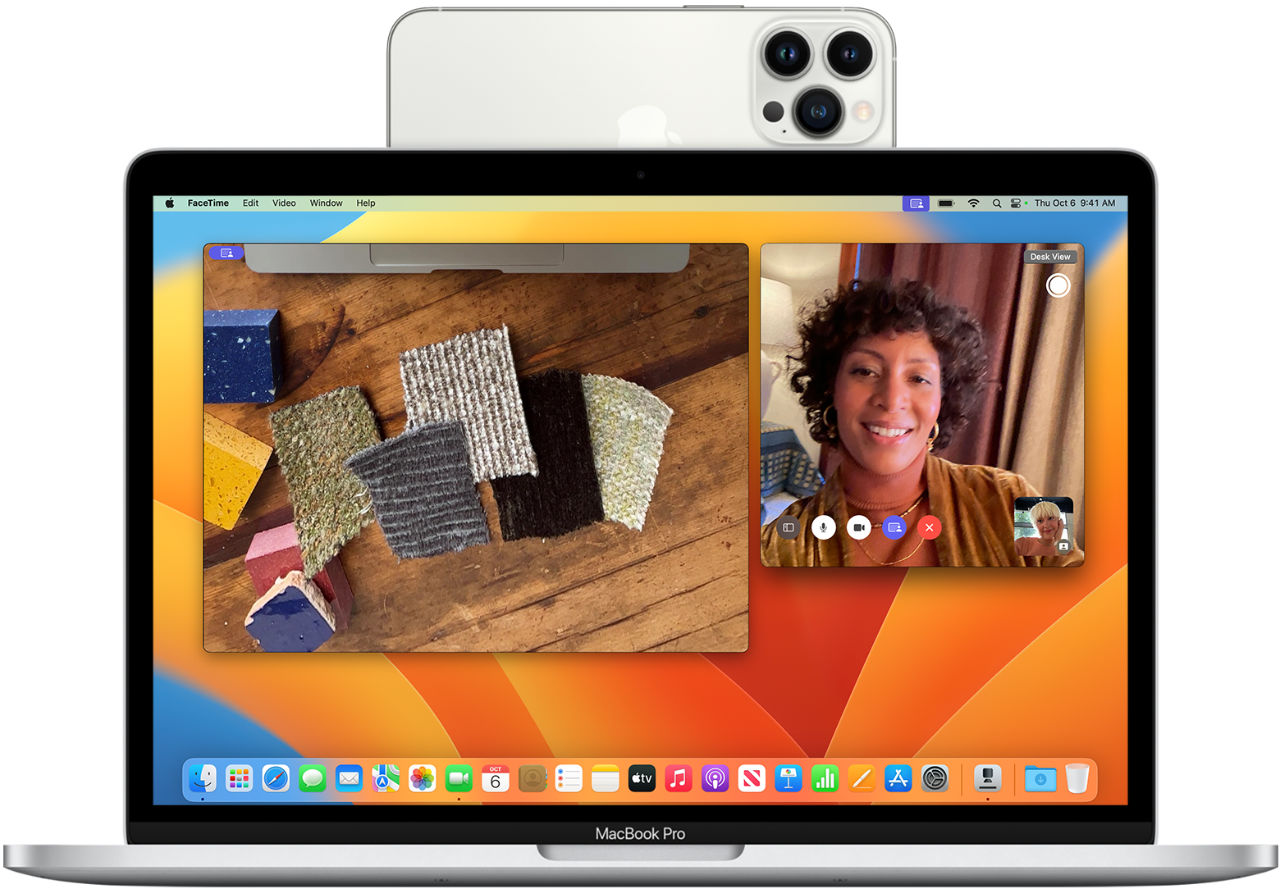
- Mounting the iPhone. We wouldn’t recommend this especially on the MacBook Air as in our test the display becomes top heavy using our iPhone Pro Max. The beauty of Continuity Camera with the iPhone is that you can place it anywhere. A dedicated stand might work better but if you have the right mounting kit such as the Belkin iPhone Mount with MagSafe above then go ahead and set your iPhone up as a webcam with the camera facing you in landscape mode. This is more stable and is a mode that is widely supported vs portrait.
- Now that you have your iPhone close to the Mac and locked, launch FaceTime. It will default to the onboard FaceTime camera to start.
- Then click on Video in the FaceTime’s top menu and from the pop-up menu, choose your iPhone and that’s it. You can now start third party apps and it will use the iPhone’s video feed by default.
- We have tested this with zoom, WhatsApp, WeChat and FaceBook Messenger. Some apps let you do the same, pick iPhone camera as the video feed if it does not automatically pick it by default.
- At this point, you may also wish to change the microphone feed to one that is on your iPhone to enjoy the benefits which we will discuss in detail next. See screenshot of pop-up menu under the section Camera and Microphone.

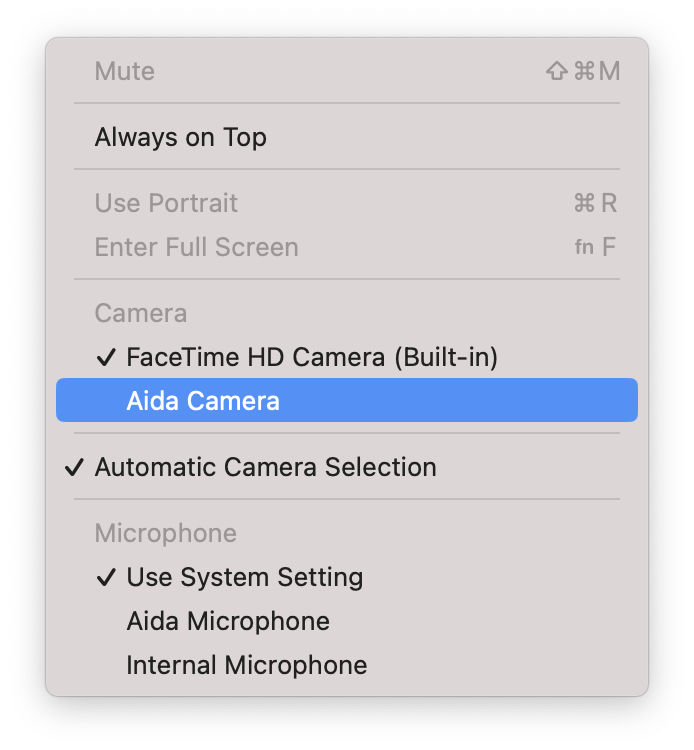
Here is also where you choose which microphone to use, see pop-up menu above under Microphone.
Other Options
There are a feat features when using the iPhone as a webcam that are worth looking into:
- Center Stage
- Desk View
- Portrait mode
- Studio Light
- Voice isolation or Wide Spectrum
These options are available in Control Centre in the menu bar. From the pop-up menu, click on Video Effects or Mic Mode to access them.
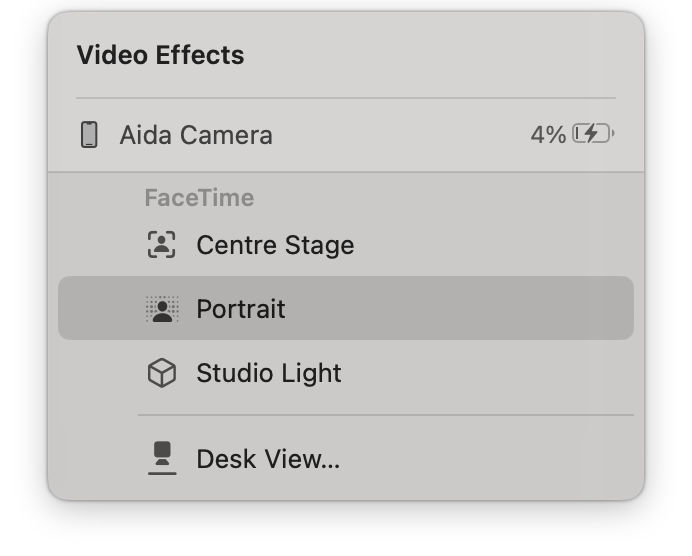
Center Stage
Choosing this video effects automatically centres you in the frame, hardware and limits of point of view permitting. For hardware, you will need at least an iPhone 11 or later. Unfortunately, iPhone SE will not support this feature. We started zoom with the iPhone as the webcam and it automatically entered Center Stage. Steps to enable this are below:
- Click on Control Centre
- Click on Video Effects
- then Center Stage
Portrait mode
Again, a video effect with iPhone as your webcam, portrait mode adds bokeh or blurred out background effect to your live feed just like it would to your portrait photos when enabled. This is akin to effects popular with video and group chat apps. This feature requires at least iPhone XR or later so more widely available. Here are the steps
- Click on Control Centre
- Click on Video Effects
- then Portrait
Studio Light
This is again similar to the Photo shooting mode that you can use on the Photo capture app. Studio Light when invoked creates brightens the foreground ie. your face and dims out the background. This creates the effect of you sitting with a studio light shining at you or in front of a windows. To use this effect go to:
- Click on Control Centre
- Click on Video Effects
- then Studio Light
Desk View (a separate app)
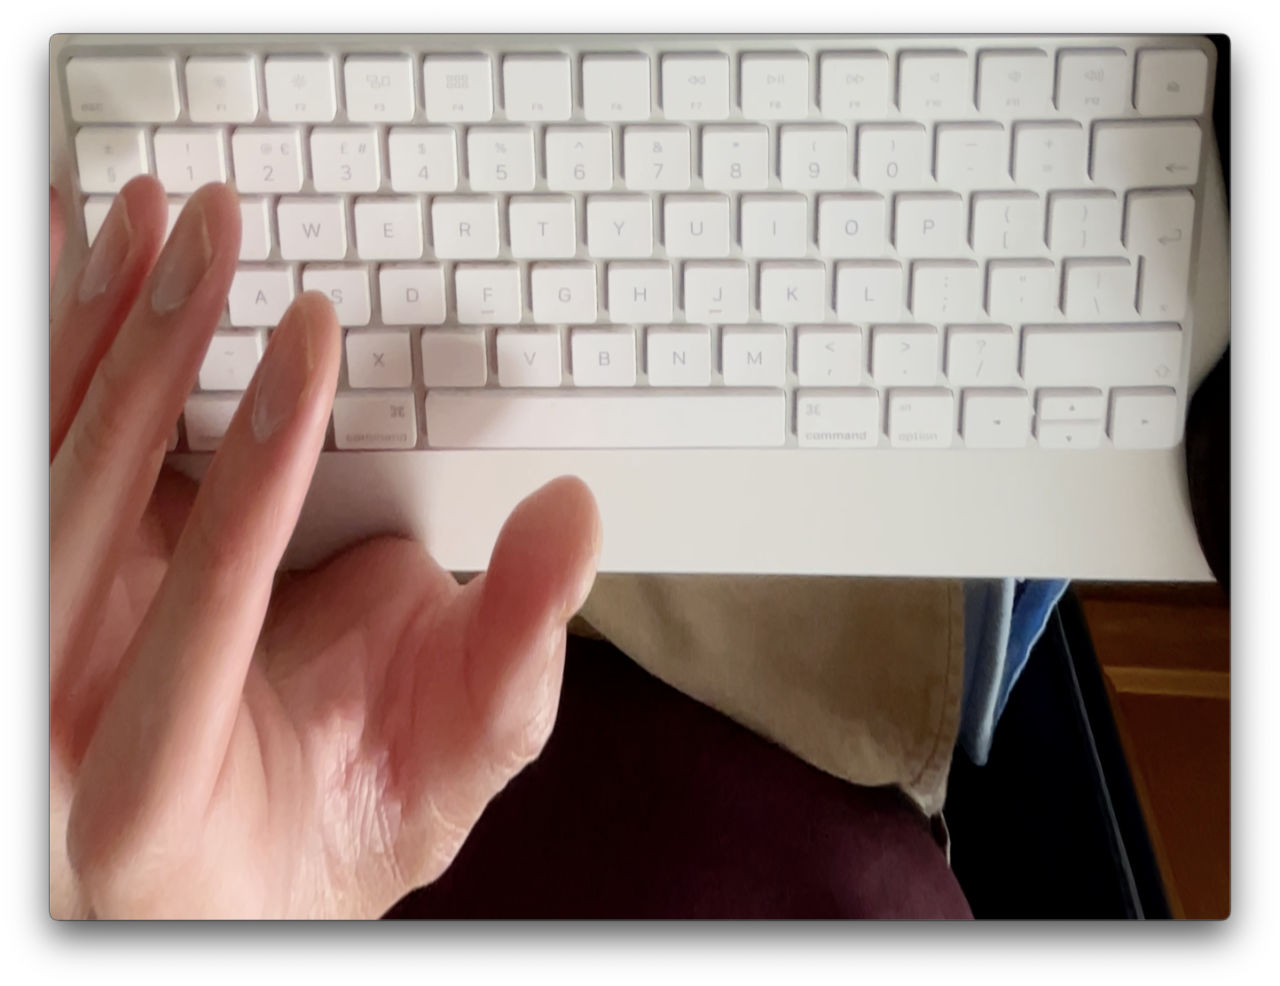
There is a dedicated app called Desk View that you can use with FaceTime. It work better on newer iPhones with ultra wide viewing angles. When enabled it shows the desk view, usually your hands on the desk or keyboard and it lets you use the zoom controls to zoom in or out. If you have a demo or something to show, this is what you need. To start:
- Click on Control Centre
- Click on Video Effects
- Then Desk View
- The Desk View app will start. If you are using this for the first time, follow through on the short wizard otherwise adjust your phone, use the zoom controls to align your desk to edge of the box.
- You can then click Start Desk View when you are ready. The image is a little distorted but useable.
Microphone Modes: Voice isolation or Wide Spectrum
During out test, we did not select the iPhone’s microphone as the sound feed so make sure you do this first before trying to use the different modes.
- Click on Control Centre
- Click on Mic Mode
- then click Voice Isolation to focus on voice and reduce background noise such as tapping on keyboard, other chatters in the background, washing machine or lawn mower in the garden.
- or click Wide Spectrum to capture all the sound normally.
So that’s all the features available to you when you make iPhone your webcam on the Mac. We hope you find this useful. Please share with us your experience using your iPhone. How you can make it better and more seamless in the comment section below.


