Auto Linking in Moodle
Here is a neat and useful but often ignored feature on Moodle, Auto Linking. A feature that has been around on Moodle for a while now but may not be visible or enabled on your server. So What does it do? How do I get it? What can I use it for? How do I control it?
What does Auto linking do?
Auto linking depending on where it is enabled, allows one of three things
- it automatically changes words or phrases into links based on the titles of your activity or resources
- it automatically create links to your glossary where words or phrases were added there
- it automatically create links to your database entries where the same words or phrases were added there.
Typically, these links are highlighted in grey and can become active retrospectively. Meaning you may not have created the activity, resource, glossary or database entry yet but when the same word or phrase is used later, the text in your content, label or section header will automatically become a link.
It’s that simple. The benefits of this is time saving and ease of use. Time saving in that teachers or content creators need not manually add every link and ease of use in that students can access the resources, activity, glossary or database entries in context.
How do I get auto linking on Moodle?
For Site Wide
Here is where you need to go to get auto linking on your Moodle server
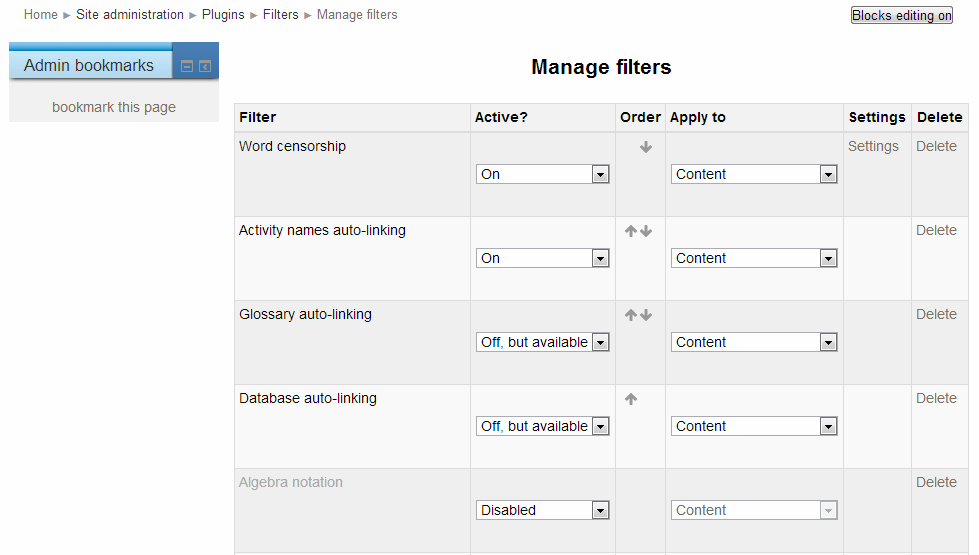
- Go to Settings > Site Administration > Plugins > Filters > Manage Filters
- Choose ‘Enable’ or ‘Off, but available’ for the following filters; Activity names auto-linking, Glossary auto-linking and Database auto-linking. in the second column
- In the third column, you can choose to apply auto-linking to Content or Content and Headings

NOTE: it is recommended that you choose to apply the filters to Content only as applying to both Contents and Headings can introduce resource overhead to your server.
If you have chosen ‘Off, but available’ in Step 2, teachers can choose to enable auto-linking manually for each course, see enabling auto link for Course below
If you cannot access any of the options above, chances are you do not have the permission to do this. Share this article with your Moodle administrator and get him or her to do this.
For Course
Here is where you need to go to get auto linking on your Course area.
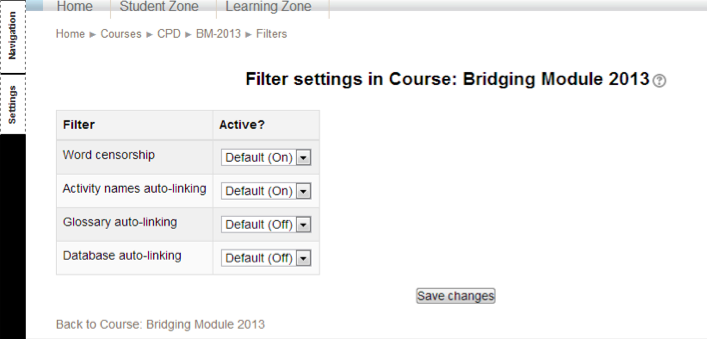
- Go to Settings > Course Administration > Filters
- There you will see a list of filters already enabled site wide, if you are the administrator follows the steps above, the list should include Activity names auto-linking, Glossary auto-linking and Database auto-linking
- From the second column headed ‘Active?’ choose from the drop-down menu to select ‘On’ or ‘Default (On)’ if not already selected.
If an ‘Off, but available’ setting is chosen site wide, you will get in Step 3 the ‘Default (Off)’ selection. In order to enable auto-linking for this course, choose ‘On’.

NOTE: It’s worth checking that if auto-linking is enabled by the administrator but you still can’t see automatic links in your content, chances are the ‘Off, but available’ setting was chosen. In that case, go to your course and perform the steps 1-3 For Course above.
For Resources & Activities
For those who wants a bit more control over what can be auto linked (or not), you can do this on the resource or activity level.
- Go to Settings > [Type] Module Administration > Filters
- There again you will find the same list of options available for Course, choose from the drop down list in the second column, labeled ‘Active?’ to turn On or Off auto linking for this particular module.
This is recommended for activities such as quiz where you don’t want students to be looking up the answers from the glossary, database or resources because it is linked.
What can I use this for?
You can use this for many things, to pull up description of scientific names in the glossary, to link to homework or online activity, to access word banks, enhance the learning of language, historical dates and events, geographical associations and more.
How do I control it?
Now there will be times when a certain word or phrase is used in more ways than one and can be confusing when these are automatically linked to the wrong resource or activity. Here is what you can do to manually unlink or flag it to Moodle so that it does not automatically link it.
- When editing highlight the text and click on click on the ‘Prevent automatic linking’ button, the icon that has a chain with the red cross over it.
- OR, When editing your content, flip to HTML mode by clicking on the HTML button on the WYSIWYG editor tool bar.
- In the HTML markup view, find the text you wish to unlink then add the following tags to the start and end of the word or phrase. <nolink> … </nolink>. You can also use the <span> class tags i.e. <span class =”nolink”>text</span> to stop the word or phrase from becoming a link.
So there it is, a simple yet overlook setting that can totally change the way your course content works, providing ease of access and a level of interactivity.
We hope you find this tutorial useful. If you have used Auto Linking in a creative and exciting way, we would like to hear about it. Leave us your comment below.


Auto Linking in Moodle « I'll stick to 140 characters....
March 2, 2014 @ 11:01 am
[…] See on http://www.colourmylearning.com […]